ABAC Design Patterns
Below you'd find common authorization design-patterns implemented in ABAC, and guides on how to implement them.
Ownership
Ownership is one of the more common authorization patterns - in which a user can perform actions only on resources they own. There are three easy ways (in addition to writing policy directly as code) to implement ownership in Permit.io - all are equally valid and it's mostly a matter of taste.
-
Ownership via tenants
Ownership is defined by having the user and resource belong to the same tenant. While implemented as an ABAC policy behind the scenes - you don't need to actually do so yourself - and you can enjoy the simplified API which treats tenants as a first class citizen.
Read here on creating and checking permissions based on tenancy.
-
Ownership via list on resource
The resource has an attribute listing all the user ids that own it. Use a dynamic resource (resource-set) to check against the list.
It would look something like this:
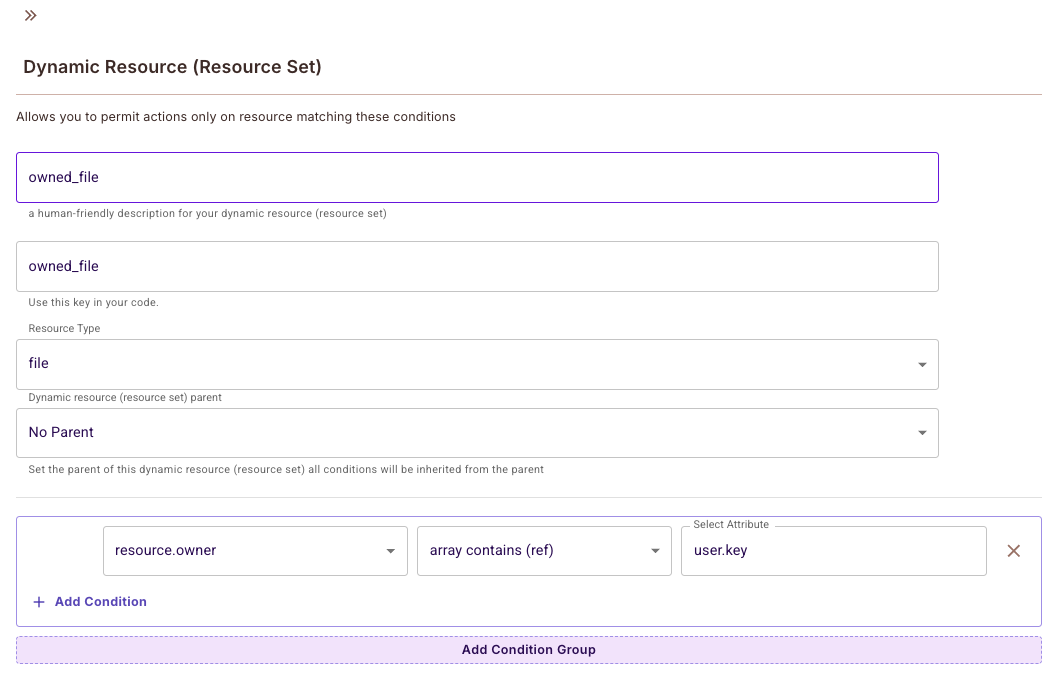
And the permission check (assuming loading the attribute as part of the check) would look something like this:
const permitted = await permit.check(userKey, "read", {type: "file", // The resource nameattributes: {owners: ["d08c85a349994aeb89a3f02c08bdb340", // user-1"48fb889360604253a5189580b48694cf", // user-2],},}); -
Ownership via list on user profile
The user profile has an attribute listing all the resource ids that it owns. Use a user-set to check against the list.
Belonging to a group
Groups are a classic ReBAC concept; but ReBAC is a subset of ABAC, and we can often use it to implement group affiliation. The group can be represented as a resource by itself, a tenant, or an attribute of users or resources.
-
Group by tenants
You can use tenants as groups - having several tenants together form the actual higher level tenant. Those can then be grouped by tenant attributes.
-
Group by attributes
You can assign users and resources to a group using an attribute like
group_idorgroup_name- Implementation here is very similar to the ownership design pattern.
Once we add ReBAC and groups natively to Permit.io - those would be the default recommended way to implement groups.
Combining your own OPA Rego code with Permit.io generated ABAC code
Permit.io allows you to extend its ABAC capabilities by writing custom Rego code. This enables you to create dynamic attributes that can be used in your ABAC policies.
How it works
- Write custom Rego code that generates attributes
- Use these attributes in your ABAC policies just like static attributes
- The custom code runs alongside Permit.io's generated ABAC code
Example: Creating a Dynamic Intersection Attribute
Let's say you want to check if there's an intersection between user and resource attributes. Instead of using static values, you can create a dynamic attribute using Rego.
Add this code to your gitops repository in the custom/ directory:
package permit.custom
import future.keywords.in

# Default value if no conditions are met
default custom_user_attributes["has_intersection"] = false

# Set to true if there's an intersection between user and resource attributes
custom_user_attributes["has_intersection"] := true {
    # Convert attributes to sets for intersection testing
    user_attr_set = {x | some x in data.users[input.user.key].attributes["attr_in_user"]}
    res_attr_set = {x | some x in input.resource.attributes["attr_in_resource"]}
    # Check if there's at least one common value
    count(user_attr_set & res_attr_set) > 0
}
- The package name must be
permit.custom - The rule name must be
custom_user_attributes - These are the only requirements - you can write any Rego logic you need
Using the Custom Attribute
Once defined, you can use this attribute in your ABAC policies just like any other attribute:
const permitted = await permit.check(userKey, "read", {
  type: "document",
  attributes: {
    attr_in_resource: ["tag1", "tag2"],
  },
});
Testing Your Custom Code
-
Using the OPA Playground
- Try this example in the OPA Playground
- Great for initial development and testing
-
Testing with Local PDP
docker run -it -p 7767:7000 -p 8181:8181 -e PDP_API_KEY=permit_key_XXXXX permitio/pdp-v2:latestThen you can:
- Send POST requests to
http://localhost:8181/v1/data/permitwith your input data - Get raw outputs including policy debug data
- Update custom policies directly at
http://localhost:8181/v1/policies/custom/example.rego
- Send POST requests to
- Start with the OPA Playground for quick iterations
- Move to local PDP for more realistic testing
- Once satisfied, commit to your gitops repository